1. Introduction
This tutorial will demonstrate how to add a transportation selection option, whose data will originate from an on-premise .csv, to our pre existing Purchase Order Document. To achieve this connection, a new Connector will be created and properly configured.
The purpose of this example is to simulate a real world scenario, where the option for the user to select the means of transportation of the order he is about to submit will be added as an upgrade to the current application.
This tutorial is an advanced implementation of the data sources tutorial. In order to understand how data sources work, please read this section of the documentation.
For this CRUD Operations tutorial, we are going to show how to interact with an external data source, by reading and manipulating its data.
As our custom data source, we are going to use a CSV file with a list of companies that provide Transportation services.
2. Prerequisites
This tutorial assumes that you have created a OMNIA tenant (click here to see how), and are logged in as a user with modeling privileges to this tenant. You must also have access to the management area to manage the connectors.
Please download this TransportationServices.csv, we’ll be using it as a data source in this tutorial.
3. Create a new connector
-
Start by accessing the management area, by clicking the option “Go to Tenants management” on the tenant selection page or, by selecting the “Management” option on the right side of a tenant top bar.
-
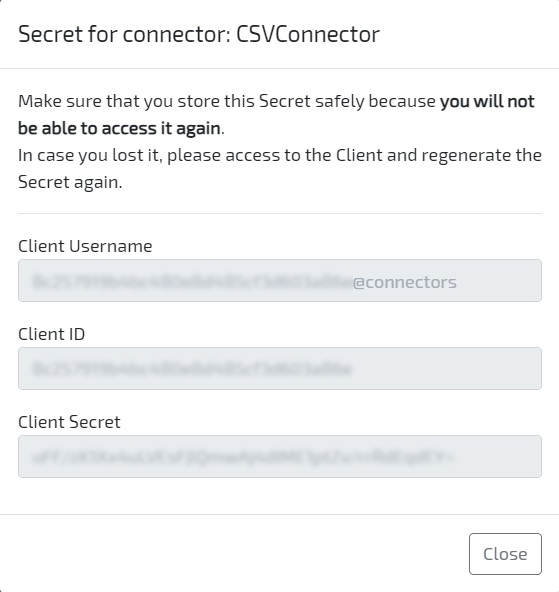
Through the left side menu, create a new connector by accessing the option Connectors / Add new. Set its Code and Name as “CSVConnector”.
Right after creating the connector, a modal with its data should be shown. Copy the Client Username, Client ID and Client Secret to use later when configuring the Connector.
-
Now we are going to grant the connector access privileges for the tenant. Access the option Security / Roles, and select Administration role for the tenant (composed by the tenant code with prefix “Administration”. E.g. AdministrationDemoTenant)
-
Click the button Add new to grant the connector user access to the tenant. The user can be retrieved on step 2, property “Client Username”. If you didn’t copy the username in that moment, select the connector on the list to access that information.
-
Now use these configurations to configure a connector on your local machine (or a Windows VM), following the installation guide and configuration guide.
-
Start the configured connector.
4. CRUD operations
-
Access OMNIA homepage, select the tenant where you are going to model and you will be redirected to the modeling area.
-
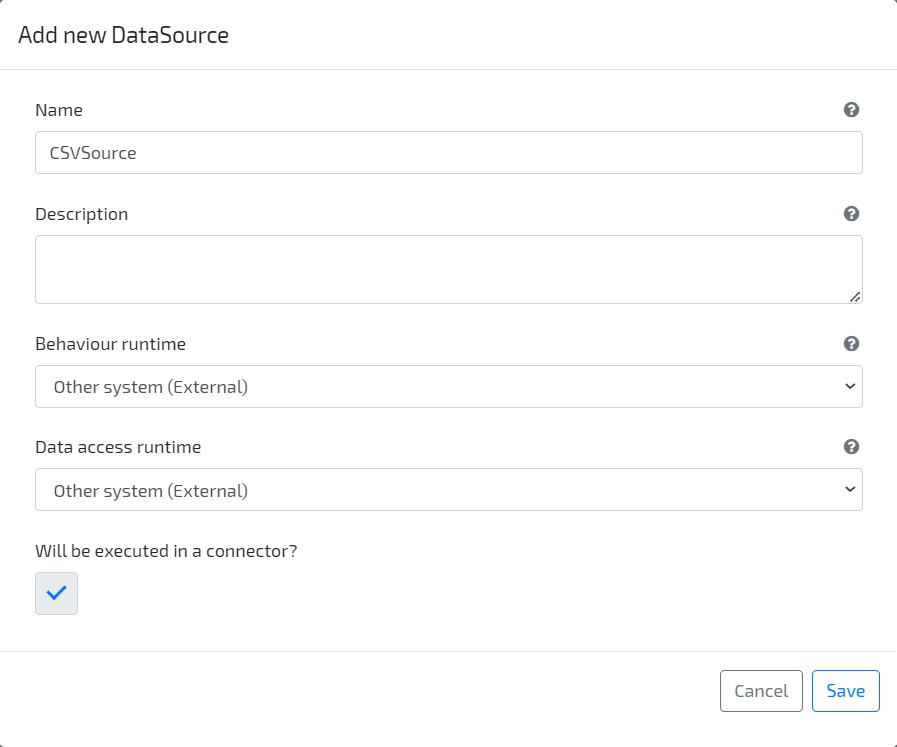
Through the left side menu, create a new Data Source by accessing the option Business / Data Sources then, Add new (button on the top right side). Set its Name as “CSVSource”, Behaviour Runtime and Data Access Runtime as “External”.
-
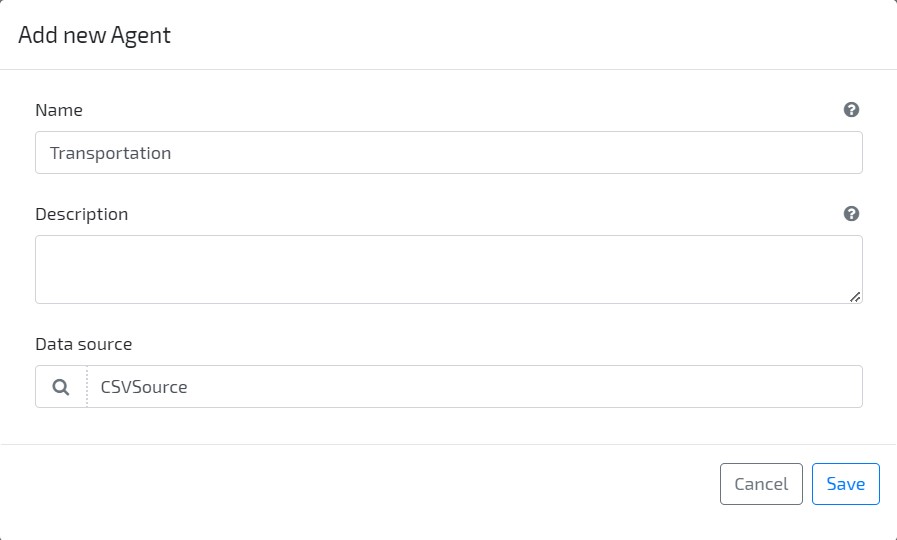
Create a new Agent with name Transportation, and set it as using the external data source CSVSource, created on the previous step.
-
Navigate to tab “Data Behaviours“, and define the behaviour code to be executed on “ReadList”. This behaviour will be used for Query and List requests for this entity.
Remember to change the variable
filePathandcsvSplitCharwith your csv file full path and the character configured as the CSV column delimiter.Copy and paste the following code:
List<IDictionary<string, object>> listData = new List<IDictionary<string, object>>(); string filePath = @"filePath\TransportationServices.csv"; char csvSplitChar = ';'; int numberOfRecords = 0; using (var reader = new System.IO.StreamReader(filePath)) { while (!reader.EndOfStream) { var line = reader.ReadLine(); var values = line.Split(csvSplitChar); Dictionary<string, object> transportationData = new Dictionary<string, object>(); if (values.Length > 1) { transportationData.Add("_code", values[0]); transportationData.Add("_name", values[1]); numberOfRecords++; listData.Add(transportationData); } } } return (numberOfRecords, listData); -
Set the code for the “Read” Data Behaviour, so that data is retrieved when you wish to select a Transportation Service for your order.
Remember to change the variable
filePathandcsvSplitCharwith your csv file full path and the character configured as the CSV column delimiter.Copy and paste the following code:
string filePath = @"filePath\TransportationServices.csv"; char csvSplitChar = ';'; TransportationDto transportation = new TransportationDto(); using (var reader = new System.IO.StreamReader(filePath)) { while (!reader.EndOfStream) { var line = reader.ReadLine(); var values = line.Split(csvSplitChar); var valuesLen = values.Length; if (values[0].Equals(identifier, System.StringComparison.InvariantCultureIgnoreCase)) { transportation._code = values[0]; transportation._name = values[1]; } } } return transportation; -
Set the code for the “Update” Data Behaviour (when a Transportation Service is updated on OMNIA).
Remember to change the variable
filePathandcsvSplitCharwith your csv file full path and the character configured as the CSV column delimiter.Copy and paste the following code:
TransportationDto transportation = new TransportationDto(); string fileContent = ""; string filePath = @"filePath\TransportationServices.csv"; char csvSplitChar = ';'; string transportationDetails = $"{dto._code}{csvSplitChar}{dto._name}{csvSplitChar}"; using (var reader = new System.IO.StreamReader(filePath)) { while (!reader.EndOfStream) { var line = reader.ReadLine(); var values = line.Split(csvSplitChar); var valuesLen = values.Length; if (!values[0].Equals(identifier, System.StringComparison.InvariantCultureIgnoreCase)) fileContent+= "\n"+line; else fileContent+= "\n"+transportationDetails; } } System.IO.File.WriteAllText(filePath, fileContent); return transportation; -
Set the code for the “Create” Data Behaviour (when a new Transportation Service is created on OMNIA).
Remember to change the variable
filePathandcsvSplitCharwith your csv file full path and the character configured as the CSV column delimiter.Copy and paste the following code:
string filePath = @"filePath\TransportationServices.csv"; char csvSplitChar = ';'; string transportationDetails = $"\n{dto._code}{csvSplitChar}{dto._name}{csvSplitChar}"; if (System.IO.File.Exists(filePath)) System.IO.File.AppendAllText(filePath, transportationDetails); return dto; -
Set the code for the “Delete” Data Behaviour (when a Transportation Service is deleted on OMNIA).
Remember to change the variable
filePathandcsvSplitCharwith your csv file full path and the character configured as the CSV column delimiter.Copy and paste the following code:
TransportationDto transportation = new TransportationDto(); string fileContent = ""; string filePath = @"filePath\TransportationServices.csv"; char csvSplitChar = ';'; using (var reader = new System.IO.StreamReader(filePath)) { while (!reader.EndOfStream) { var line = reader.ReadLine(); var values = line.Split(csvSplitChar); var valuesLen = values.Length; if (!values[0].Equals(identifier, System.StringComparison.InvariantCultureIgnoreCase)) fileContent+= "\n"+line; } } System.IO.File.WriteAllText(filePath, fileContent); return true; -
Build & Deploy model
-
Go to the Application area.
-
Create a new instance of the CSVSource data source, with code “LOCAL” and with the Code of the Connector (CSVConnector) that you have created.
-
On left side menu, navigate to Configurations / Transportation, identify the CSVSource data source instance (LOCAL) and check that the list is filled with data retrieved from CSVSource.
-
Now you can list and update your transportation services directly on your on-premise system, providing your connector is correctly configured and running.
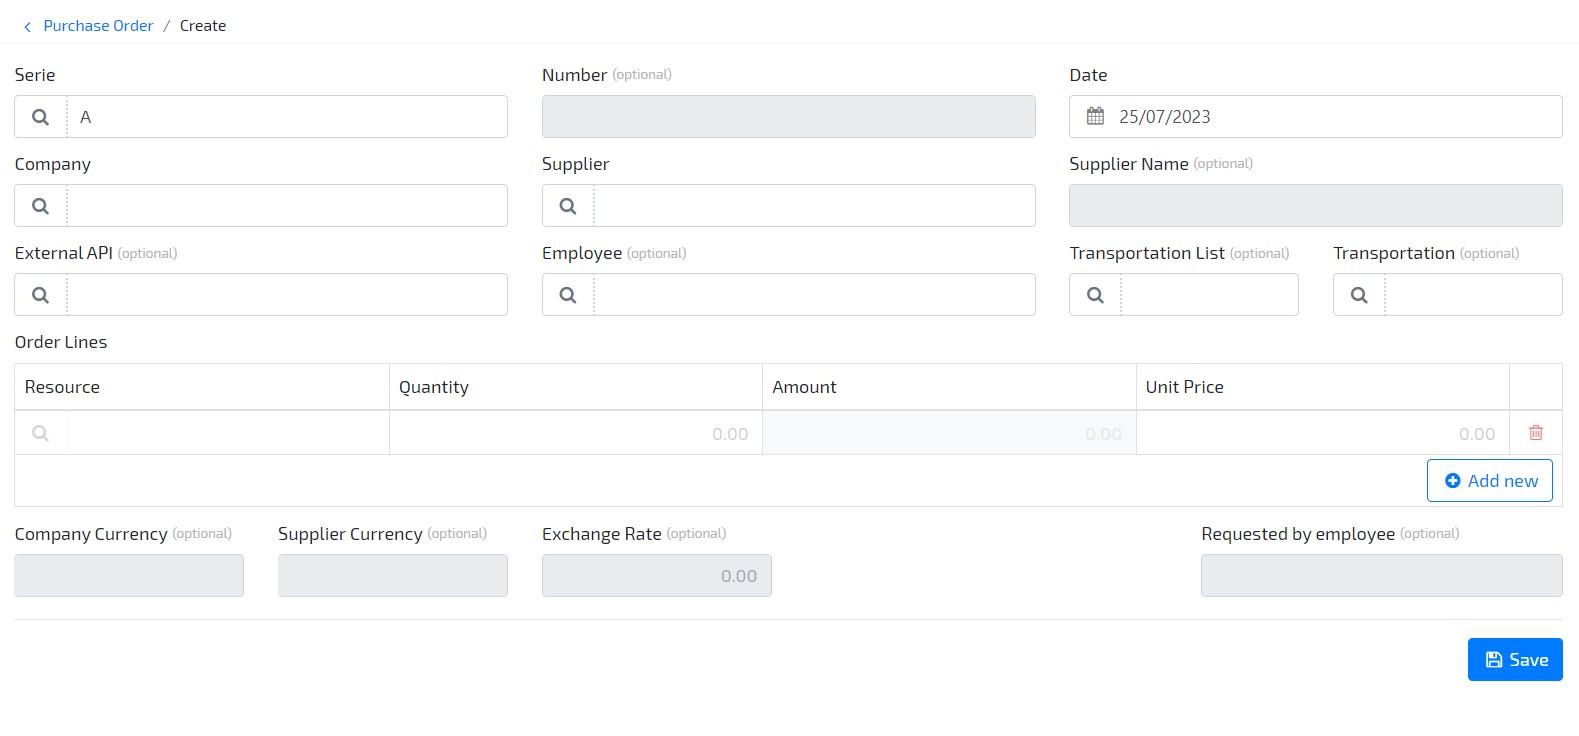
5. Add Transportation option to Purchase Document
-
Go to your Purchase Order Document and add two new Reference attributes: 1.1 One reference to which (transportation) list we are going to read from:
- Name: “TransportationList”
- Type: Data Source > CSVSource
1.2 One reference to the elements of the selected list:
- Name: “Transportation”
- Type: “Agent > Transportation”
- Uses data source from attribute: TransportationList
-
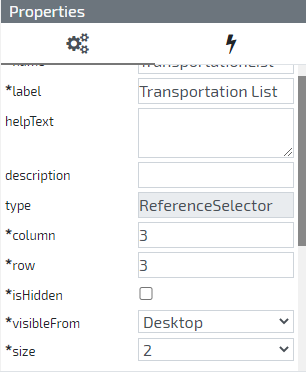
Let’s adjust the UI of our newly created elements, so that they fit visually in our Purchase Order Document. Edit the PurchaseOrderForm using the option User Interface / Forms, select the element and change it’s UI values to:
Element: “Transportation List”
- Row: 3
- Column: 9
-
Size: 2
Element: “Transportation”
- Row: 3
- Column: 4
-
Size: 2
 (if your UI doesn’t match this one, don’t worry, you’ve just skipped one or more tutorials along the way)
That’s it! Your Purchase Document now reads directly from a specific Data Source, and simulates the integration of a delivery system selection option alongside your order.
Go to Advanced Connector Tutorial.