1. Introduction
Based on a simple Employee management scenario, this tutorial shows a real scenario of how easily OMNIA can use information from an external data source, using the OMNIA connector to access data located on-premises.
This tutorial is an advanced implementation of the data sources tutorial in order to understand how data sources work, please read this section of the documentation.
On the CRUD Operations tutorial area, we are going to evaluate how to interact with an external data source, by reading and manipulating its data.
As our custom data source, we are going to use the PRIMAVERA ERP V10.
2. Prerequisites
This tutorial assumes that you have created a OMNIA tenant (click here to see how), and are logged in as a user with modeling privileges to this tenant. You must also have access to the management area to manage the connectors.
This tutorial also requires an access to Primavera ERP, on version 10.
3. Create a new connector
-
Start by accessing the management area, by clicking the option “Go to Tenants management”.
-
Through the left side menu, create a new connector by accessing the option Connectors / Add new. Set its Code and Name as “TutorialConnector”
Right after creating the connector, a modal with its data should be shown. Copy the Client Username, Client ID and Client Secret to use later when configuring the Connector.
-
Now we are going to grant the connector access privileges for the tenant. Access the option Security / Roles, and select Administration role for the tenant (composed by the tenant code with prefix “Administration”. E.g. AdministrationDemoTenant)
-
Click the button Add new to grant the connector user access to the tenant. The user can be retrieved by selecting the connector and copying the property “Client Username” value
-
Now use these configurations to configure a connector in the machine with the Primavera ERP, following the installation guide and configuration guide.
-
Start the configured connector.
4. CRUD operations
-
Access Omnia homepage, select the tenant where you are going to model and you will be redirected to the modeling area.
-
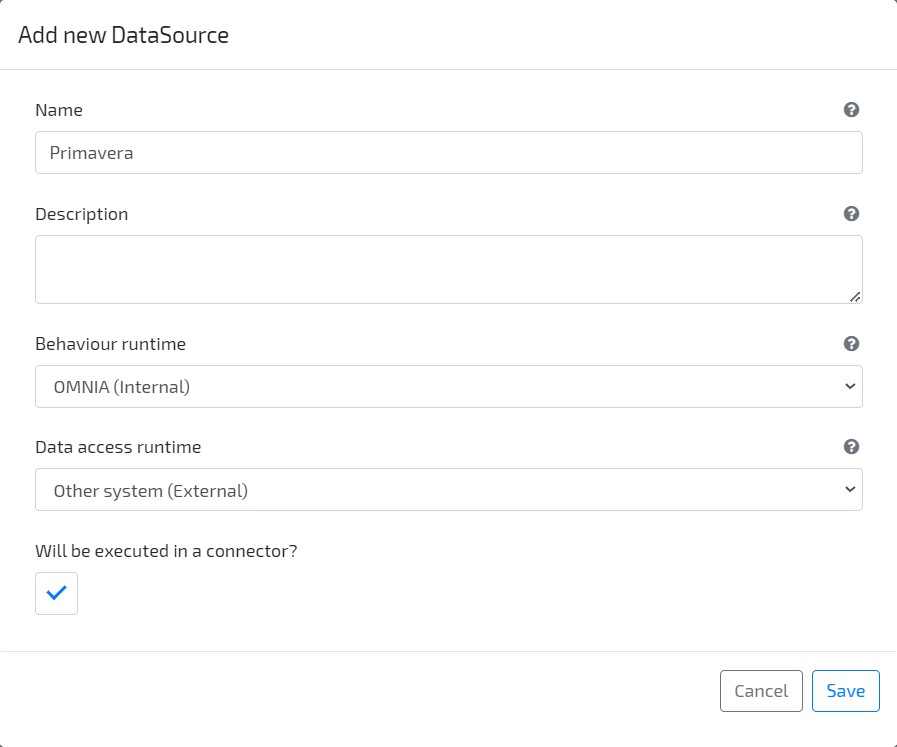
Through the left side menu, create a new Data Source by accessing the option Business / Data Sources / Add new on the top right side. Set its Name as “Primavera”, Behaviour Runtime as “Internal” and Data Access Runtime as “External”.
-
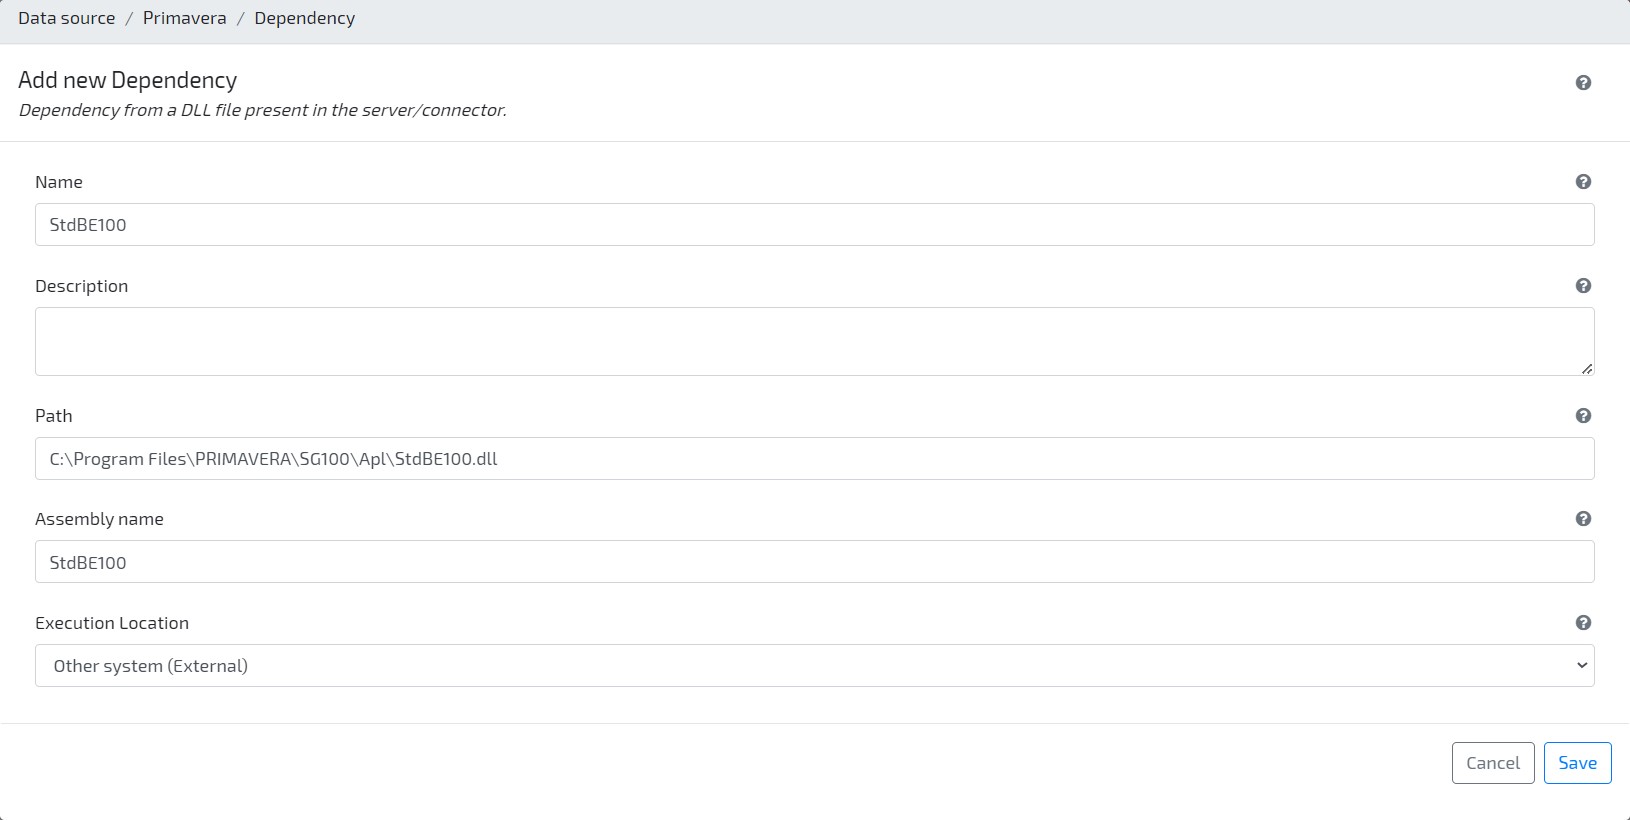
Navigate to tab Behaviour Dependencies, and define a reference for Primavera assemblies:
- StdBE100.dll
- ErpBS100.dll
- IRhpBS100.dll
- RhpBE100.dll
-
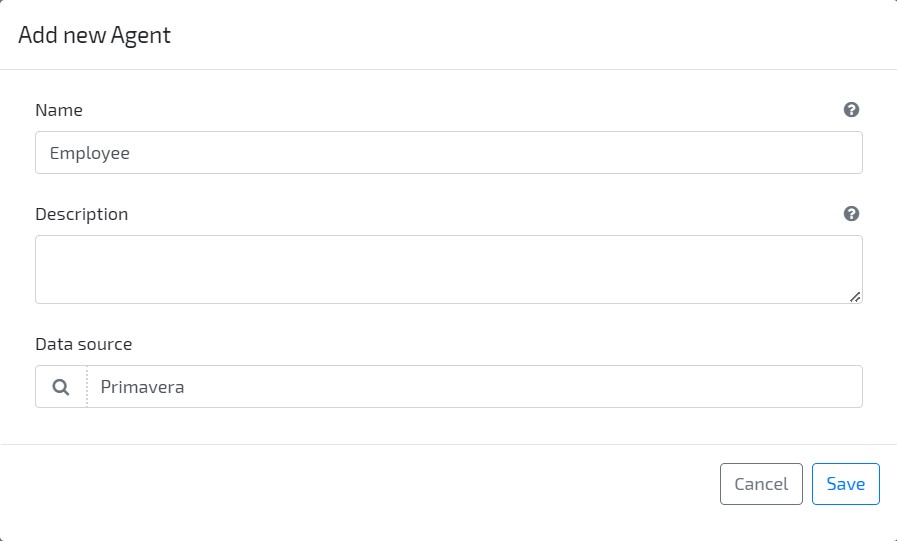
Create a new Agent with name “Employee”, and set it as using the external data source “Primavera” that you created earlier.
-
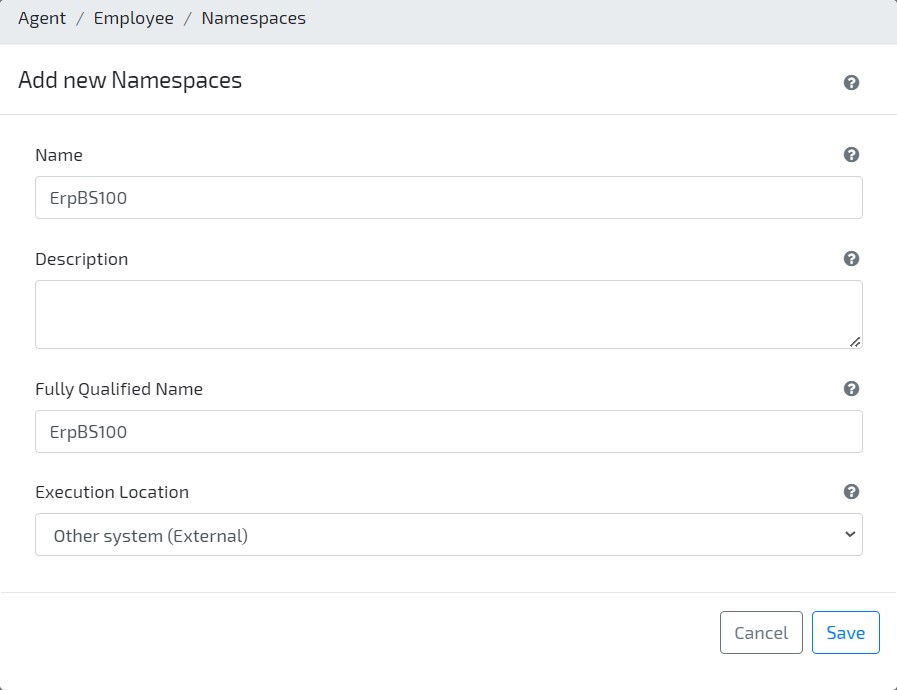
Navigate to tab Behaviour Namespaces and reference the following namespaces:
- StdBE100
- ErpBS100
- RhpBE100
-
Navigate to tab “Data Behaviours“, and set the code expression for the “ReadList” behaviour. This behaviour will be used for Query and List requests for this entity.
Copy and paste the following code (Remember to change the
"username"and"password"fields to your actual username and password.):ErpBS qbsERP = new ErpBS(); try { List<IDictionary<string, object>> employeesList = new List<IDictionary<string, object>>(); string username = ""; string password = ""; qbsERP.AbreEmpresaTrabalho(StdBETipos.EnumTipoPlataforma.tpEmpresarial, "DEMO", username, password); StdBELista queryResults = qbsERP.Consulta($"SELECT Employees.EmployeesCount, Codigo, Nome FROM Funcionarios CROSS JOIN (SELECT Count(*) AS EmployeesCount FROM Funcionarios) AS Employees ORDER BY Codigo OFFSET {(page - 1)*pageSize} ROWS FETCH NEXT {pageSize} ROWS ONLY"); int numberOfRecords = Convert.ToInt32(queryResults.Valor("EmployeesCount").ToString()); while (!queryResults.NoFim()) { var employee = new Dictionary<string, object>() { { "_code", queryResults.Valor("Codigo").ToString()}, { "_name", queryResults.Valor("Nome").ToString()} }; employeesList.Add(employee); queryResults.Seguinte(); } return (numberOfRecords, employeesList); } catch (Exception e) { Console.WriteLine(e.Message); throw; } finally { if (qbsERP.Contexto.EmpresaAberta) qbsERP.FechaEmpresaTrabalho(); } -
Set the code expression for the “Read” Data Behaviour, so that data is retrieved when an Employee is edited on OMNIA.
Copy and paste the following code (Remember to change the
"username"and"password"fields to your actual username and password.):ErpBS qbsERP = new ErpBS(); try { EmployeeDto dto = new EmployeeDto(); string username = ""; string password = ""; qbsERP.AbreEmpresaTrabalho(StdBETipos.EnumTipoPlataforma.tpEmpresarial, "DEMO", username, password); StdBELista queryResults = qbsERP.Consulta($"SELECT Codigo, Nome, Email, Telefone FROM Funcionarios WHERE Codigo = '{identifier}'"); if (!queryResults.Vazia()) { dto._code = queryResults.Valor("Codigo").ToString(); dto._name = queryResults.Valor("Nome").ToString(); } else { throw new Exception($"Could not retrieve Employee with code '{identifier}'"); } return dto; } catch (Exception e) { Console.WriteLine(e.Message); throw; } finally { if (qbsERP.Contexto.EmpresaAberta) qbsERP.FechaEmpresaTrabalho(); } -
Set the code expression for the “Update” Data Behaviour (when an Employee is updated on OMNIA).
Copy and paste the following code (Remember to change the
"username"and"password"fields to your actual username and password.):ErpBS qbsERP = new ErpBS(); try { string username = ""; string password = ""; qbsERP.AbreEmpresaTrabalho(StdBETipos.EnumTipoPlataforma.tpEmpresarial, "DEMO", username, password); RhpBEFuncionario funcionario = qbsERP.RecursosHumanos.Funcionarios.Edita(dto._code); funcionario.Nome = dto._name; qbsERP.RecursosHumanos.Funcionarios.Actualiza(funcionario); return dto; } catch (Exception e) { Console.WriteLine(e.Message); throw; } finally { if (qbsERP.Contexto.EmpresaAberta) qbsERP.FechaEmpresaTrabalho(); } -
Build & Deploy model
-
Go to the Application area.
-
Create a new instance of the Primavera data source, with code “DEMO” and with the Code of the Connector that you have created.
-
On left side menu, navigate to Configurations / Employee, identify the Primavera data source instance (DEMO) and check that the list is filled with data retrieved from Primavera.
-
Now you can List and Update Employees directly on your on-premise system, providing your connector is correctly configured and running.