1. Introduction
In the OMNIA Platform, the primary way to customize the way the application works is by using Behaviours.
Behaviours are code that allow you to extend the way the application processes user input.
User interface-specific behaviours, written in JavaScript, allow you to customize the way the web application of the platform works. This means extending the way a modeled Form behaves - hiding fields, making them read-only, increasing their size, etc.
The API-side behaviours are described on this page. Any behaviour that is related to the business logic should be created using those behaviours, as they are the only ones that always run!
A UI behaviour is defined by:
- its type, or the moment in which it will execute;
- (optionally) its element, or which element of the form it is dependent on;
- its expression, the aforementioned JavaScript code.
UI Behaviours are executed by the web app - when creating or editing an entity, it will execute the appropriate behaviours at the times defined.
2. Types of Behaviours
It’s possible to extend the user interface through custom behaviours in Forms, Dashboards, Calendars and Menu.
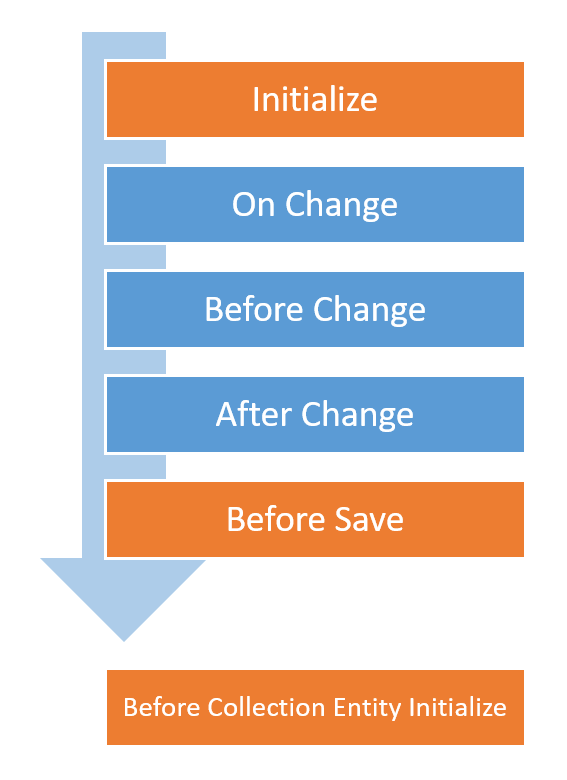
There are multiple different execution moments for UI behaviours, which follow a logical flow:
- Initialize: Executes when entering the page (form, dashboard or menu);
- On Change: Executes during updates, requires an element, and, given the new value of the attribute associated to that element, performs an operation. Similar role to Action in the entity behaviours (only applies to forms and dashboards);
- Before Change: Executes immediately before the update request is send to the API (only applies to forms);
- After Change: Executes immediately after the API response to the update request (only applies to forms);
- Before Save: Executes when an entity is saved (only applies to forms);
-
After Save: Executes after an entity is saved (only applies to forms);
Other than these, there are some special behaviours:
-
Before Collection Entity Initialize: Executes when a new entity is added to a collection, before its Initialize behaviour (only applies to forms);
- **_Example of usage_**: Allocate the value of a Parent's _(this)_ property to a collection's Child _(entry)_ property: ```Javascript entry.company = this.name; ``` - On Select: Executes when an Menu Entry is selected (only applies to menus);
- On Click: Executes when a Button is clicked (only applies to buttons);
- Refresh: Executes when a Dashboard is refreshed (only applies to dashboards);
- Create: Executes when the Dashboard “Add new” button is clicked (only applies to dashboards);
- On Cell Click: Executes when a column of a list within a Dashboard is clicked (only applies to dashboards);
- On Category Toggle: Executes when the visibility of one or more categories is changed (only applies to calendars);
- On Date Range Change: Executes when the visible date range changes, either by navigating to another period or changing view (only applies to calendars);
- On Form Open: Executes when the form that details a mapped calendar entry opens (only applies to calendars inside forms);
- On Form Close: Executes when the form that details a mapped calendar entry closes (only applies to calendars inside forms);
- On Event Click: Executes when an event in a calendar is clicked (only applies to calendars inside dashboards);
- On Event Export: Executes when an event in a calendar is exported;
Important
In a form, the On Change behaviours are only executed when the user changes directly the input.
If the value of an element is set using other behaviour (User Interface or not), the On Change code will not be executed.
In a dashboard, the On Change behaviours is executed after the list data is retrieved.
2.1. JavaScript method naming
| Type | Method | Observation |
|---|---|---|
| Initialize | onInitialize() | |
| Before Change | onBeforeChange() | Available in Forms. |
| On Change | onChange_{ELEMENT NAME}(oldValue, newValue) | |
| On Select | onSelect_{ELEMENT NAME}() | Available in Menus |
| After Change | onAfterChange() | Available in Forms. |
| Before Save | onBeforeSave() | Available in Forms. |
| After Save | onAfterSave(operation, identifier) | Available in Forms. |
| Before Collection Entity Initialize | OnBefore{ATTRIBUTE NAME}EntityInitialize(entry) | Available in Forms. |
| On Click | OnClick_{ELEMENT NAME}() | Available in Buttons. |
| Refresh | onRefresh() | Available in Dashboards. |
| Create | onCreate() | Available in Dashboards. |
| On Cell Click | onCellClick_{ELEMENT NAME}(column, line) | Available in Dashboards. |
| On Category Toggle | onCategoryToggle_{ELEMENT NAME}(categories) | Available in Calendars. |
| On Date Range Change | onDateRangeChange_{ELEMENT NAME}(startDate, endDate, view) | Available in Calendars. |
| On Form Open | onFormOpen_{ELEMENT NAME}(line, index) | Available in Calendars inside Forms. |
| On Form Close | onFormClose_{ELEMENT NAME}(line, index, operation) | Available in Calendars inside Forms. |
| On Event Click | OnEventClick_{ELEMENT NAME}(event, isStatic) | Available in Calendars inside Dashboards. |
| On Event Export | onEventExport_{ELEMENT NAME}(dataEvent, isMapped, exportEvent, exportType) | Available in Calendars. |
| On Tab Select | onTabSelect_{ELEMENT NAME}(tabName) | Available in Tab Control. |
| On Csv Export | onCsvExport_{ELEMENT NAME}(parameters) | Available in Lists inside dashboards. |
3. Usage
There are many possible usage scenarios for these behaviours, as JavaScript coding will allow you to execute whatever you want. Usage examples are described in our FAQ.
4. Structure of the class
The JavaScript class is organized in the following way:
- a class object, containing:
- a constructor, which sets the metadata object, and initializes all of the elements in the form.
- a method for each of the behaviours described above, with any code that the user may have modeled.
- if the form has any lists (for example, lists of commitments in a document’s form), the code to add and remove lines from those lists
- if the form has any lists, another class object for each of those lists, with the same structure.
An excerpt of a sample class, for an entity with no lists, would be:
class EmployeeForm {
  constructor(metadata) {
    this._metadata = metadata;

    this._code = "";
    this._description = null;
    this._inactive = false;
    this._name = "";
  }

  onInitialize() {
    console.log("Started work on an Employee entity");
  }

  onChange__code(newValue) {}

  //... more onChanges

  onBeforeSave() {}
}

EmployeeForm;
The metadata object is the primary way of interacting with the form. If you want to set values of the fields, you can do it directly, i.e. this._description = "This is a Description!". However, for anything more complicated, you will need to use the metadata.
Its structure can be seen by checking the API (Metadata controller, in the Application area), but the part we want to manipulate, in these behaviours, is the elements object.
The elements object contains a list of all the elements in the form. For example, you can access the Code element by this._metadata.elements._code and manipulate its properties.
An element has the following properties:
| Property | Explanation |
|---|---|
| attributes | A series of properties which govern the way the element displayed on the form: isReadOnly: set it to "true" to have the field be read only, to "false" otherwise. |
| column, row, and size | Control the size and position of the element in the form. |
| isHidden | Set to false to show the field, and to true to hide it. |
| messages | An array of messages (error or otherwise) to display under the field. See the FAQ for usage examples. |
| label | The label of the field. |
| helpText | The Help Text of the field. Can be set, if none exists, and it will show up. |
5. Developing and testing UI behaviours
Detailed information here.